
Developer Guide
- Acknowledgements
- Setting up, getting started
- Design
- Implementation
- Documentation, logging, testing, configuration, dev-ops
- Appendix: Requirements
- Appendix: Instructions for Manual Testing
- Appendix: Effort
- Appendix: Planned Enhancements
Acknowledgements
Dong Cheng-Yu’s Acknowledgements
- Used ChatGPT to assist in writing Javadocs for AddDoctorCommandParser, AddDoctorCommand, and DeleteAppointmentCommandParser.
Lu Zhiyang’s Acknowledgements
- Used ChatGPT to assist in writing Javadocs for AddPatientCommandParser, AddPatientCommand, EditAppointmentCommandParser, EditAppointmentCommand.
Lim Jia Wei’s Acknowledgements
- Used ChatGPT to assist in writing Javadocs for QueryDoctorAppointmentCommand, QueryPatientAppointmentCommand, QueryDoctorAppointmentCommandParser, QueryPatientAppointmentCommandParser, QueryPatientCommand and QueryPatientCommandParser.
- Used ChatGPT to assist in writing parts of User Guide and Developer Guide and test code.
Sim Eugene’s Acknowledgements
- Used ChatGPT to assist in writing Javadocs for EditCommand, EditCommandParser and QueryDoctorCommand
Goswami Archit’s Acknowledgements
- Used ChatGPT to assist in writing Javadocs for getPersonByNric(), addAppointment(), hasAppointment(), deleteAppointment() methods, and to write some javafx code
Setting up, getting started
Refer to the guide Setting up and getting started.
Design
.puml files used to create diagrams in this document are in the docs/diagrams folder. Refer to the PlantUML Tutorial at se-edu/guides to learn how to create and edit diagrams.
Architecture

The Architecture Diagram given above explains the high-level design of MediCLI and the various components.
Given below is a quick overview of main components and how they interact with each other.
Main components of the architecture
Main (consisting of classes Main and MainApp) is in charge of the app launch and shut down.
- At app launch, it initializes the other components in the correct sequence, and connects them up with each other.
- At shut down, it shuts down the other components and invokes cleanup methods where necessary.
The bulk of the app’s work is done by the following four components:
-
UI: The UI of the App. -
Logic: The command executor. -
Model: Holds the data of the App in memory. -
Storage: Reads data from, and writes data to, the hard disk.
Commons represents a collection of classes used by multiple other components.
How the architecture components interact with each other
The Sequence Diagram below shows how the components interact with each other for the scenario where the user issues the command addpatient.

Each of the four main components (also shown in the diagram above),
- defines its API in an
interfacewith the same name as the Component. - implements its functionality using a concrete
{Component Name}Managerclass (which follows the corresponding APIinterfacementioned in the previous point.
For example, the Logic component defines its API in the Logic.java interface and implements its functionality using the LogicManager.java class which follows the Logic interface. Other components interact with a given component through its interface rather than the concrete class (reason: to prevent outside component’s being coupled to the implementation of a component), as illustrated in the (partial) class diagram below.

The sections below give more details of each component.
UI component
The API of this component is specified in Ui.java

The UI consists of a MainWindow that is made up of parts e.g.CommandBox, ResultDisplay, PersonListPanel, AppointmentListPanel, StatusBarFooter etc. All these, including the MainWindow, inherit from the abstract UiPart class which captures the commonalities between classes that represent parts of the visible GUI.
The UI component uses the JavaFx UI framework. The layout of these UI parts are defined in matching .fxml files that are in the src/main/resources/view folder. For example, the layout of the MainWindow is specified in MainWindow.fxml
The UI component,
- executes user commands using the
Logiccomponent. - listens for changes to
Modeldata so that the UI can be updated with the modified data. - keeps a reference to the
Logiccomponent, because theUIrelies on theLogicto execute commands. - depends on some classes in the
Modelcomponent, as it displaysPerson(DoctororPatient) andAppointmentobjects residing in theModel.
Logic component
API : Logic.java
Here’s a (partial) class diagram of the Logic component:

The sequence diagram below illustrates the interactions within the Logic component, taking execute("delete 1") API call as an example.

DeleteCommandParser should end at the destroy marker (X) but due to a limitation of PlantUML, the lifeline continues till the end of diagram.
How the Logic component works:
- When
Logicis called upon to execute a command, it is passed to anAddressBookParserobject which in turn creates a parser that matches the command (e.g.,AddDoctorCommandParser) and uses it to parse the command. - This results in a
Commandobject (more precisely, an object of one of its subclasses e.g.,AddDoctorCommand) which is executed by theLogicManager. - The command can communicate with the
Modelwhen it is executed (e.g. to add a doctor).
Note that although this is shown as a single step in the diagram above (for simplicity), in the code it can take several interactions (between the command object and theModel) to achieve. - The result of the command execution is encapsulated as a
CommandResultobject which is returned back fromLogic.
Here are the other classes in Logic (omitted from the class diagram above) that are used for parsing a user command:

How the parsing works:
- When called upon to parse a user command, the
AddressBookParserclass creates anXYZCommandParser(XYZis a placeholder for the specific command name e.g.,AddPatientCommandParser) which uses the other classes shown above to parse the user command and create aXYZCommandobject (e.g.,AddPatientCommand) which theAddressBookParserreturns back as aCommandobject. - All
XYZCommandParserclasses (e.g.,AddPatientCommandParser,DeleteCommandParser, …) inherit from theParserinterface so that they can be treated similarly where possible e.g, during testing.
Model component
API : Model.java

The Model component,
- stores the address book data i.e., all
Personderivative objects (which are contained in aUniquePersonListobject) and - all
Appointmentobjects (which are contained in aUniqueAppointmentListobject) stores the currently ‘selected’Personobjects (e.g., results of a search query, either aPatientorDoctorinstance) andAppointmentobject (e.g results of an query) as a separate filtered list which is exposed to outsiders as an unmodifiableObservableList<Person>andObservableList<Appointment>that can be ‘observed’ e.g. the UI can be bound to this list so that the UI automatically updates when the data in the list change. - stores a
UserPrefobject that represents the user’s preferences. This is exposed to the outside as aReadOnlyUserPrefobjects. - does not depend on any of the other three components (as the
Modelrepresents data entities of the domain, they should make sense on their own without depending on other components)
Storage component
API : Storage.java

The Storage component,
- can save both address book data and user preference data in JSON format, and read them back into corresponding objects.
- inherits from both
AddressBookStorageandUserPrefStorage, which means it can be treated as either one (if only the functionality of only one is needed). - depends on some classes in the
Modelcomponent (because theStoragecomponent’s job is to save/retrieve objects that belong to theModelsuch asAppointmentandPatient)
Common classes
Classes used by multiple components are in the seedu.addressbook.commons package.
Implementation
This section describes some noteworthy details on how certain features are implemented.
The section is structured as follows:
- We first dive into the implementation of the
Appointment- a special entity type that MediCLI tracks. - We then explore what happens when the
executemethod of different types ofCommandsis called. - Finally, we look at how MediCLI deals with incorrect user inputs for operations on both
PersonsandAppointments
Through this, we hope to give you a thorough overview of how MediCLI’s main features are implemented.
Understanding Appointments: A new entity type
MediCLI offers support for appointments, represented by the Appointment class on top of existing support for Doctors and Patients.
At the crux of it, the Appointment class aims to reflect the essence of a medical appointment in real life, which involves a doctor and a patient and takes place at a specific time.
The class diagram below displays the structure of the Appointment class.
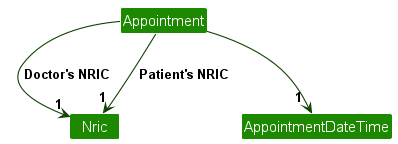
As visible, the Appointment class contains references to the following classes:
-
Nric: a doctor’s & a patient’s NRIC number -
AppointmentDateTime: Date and time of the appointment
The appointment class must have reference to exactly 2 Nric objects and 1 AppointmentDateTime object.
Below is an object diagram demonstrating a possible appointment object.

In the object diagram you see that two instances of the Nric class have been instantiated, one as doctorNric, and one as patientNric. This of course is along with the appointmentDateTime.
An instance of the Appointment class can only be created if the date & time of the appointment is >= the current date and time. This is enforced through the isValidAppointmentDateTime method in the Appointment class.
Context and thought process behind implementation:
Implementing Appointments naturally involved many design decisions, and here we have attempted to outline the thought process behind our current implementation:
- One key focus of the
Appointmentimplementation was to keep it as similar to the implementation ofPatientsandDoctors. - The idea is that at the end of the day, the
Appointmentis simply another type of entry being tracked. - Nevertheless, it is natural that both in the UI and backend, we would want to differentiate the
Appointmententries from thePatient/Doctorentries to ensure that the system is more flexible and easy to expand on in the future. - Hence, while similar in terms of the functionality, a lot of the infrastructure to handle
Appointmentswas built parallel to the one forPatient/Doctorentries.- For instance, there is a separate
UniqueAppointmentListclass for storing and manipulatingAppointmentsthat functions very similar to the equivalent list forPatient/Doctorentries (UniquePersonList).
- For instance, there is a separate
Implementation and justification:
- Based on the thought process, the approach taken was to ensure MediCLI had the same way of handling
AppointmentsandPatients/Doctors. - The overall structure including how
Appointmentsare stored, managed etc. is largely similar to support debugging and improve readability and comprehension. - In other words, if you understand how MediCLI manages
Patients/Doctors, you will also understand how it managesAppointments. - Some differences are however inevitable and have been listed below:
-
Appointmentobjects includedoctorNric,patientNricas attributes. ADoctorandPatientwith the corresponding NRIC number must already exist before theAppointmentwas created. -
Appointmentsare stored in a separate list in the backend, called theUniqueAppointmentList, to allow for different operations and flexibility down the line. - In terms of the UI,
Appointmentsappear in a separate column to ensure that the user is able to clearly distinguish between them.
-
Alternatives considered
- One key alternative we looked at was storing
Appointmentobjects withPatientandDoctorobjects as part of the same list i.e.UniquePersonList. - This would mean changing the
Personclass to a different one such asEntryand have all three ofPatient,DoctorandAppointmentextend from theEntryclass. - We decided against this because we thought that it was not the most OOP friendly solution and would not allow for flexibility down the line.
- Eg: what if we wanted to add a feature that showed all
Appointmentsfor a set ofPatientsbetween a set of dates? Having them in the same list would be unintuitive and make the filtration and display quite cumbersome.
- Eg: what if we wanted to add a feature that showed all
- Furthermore, it might get confusing for the user if everything was dumped into the same list for them to sieve through. Perhaps the user was only concerned with looking up
Patientsin which case theAppointmentswould simply be added clutter. - The increased level of integration would also be problems for implementation and testing as existing functionality would have to be adapated, exposing the system to more risks and potential for bugs.
- Eg: the class in question would have to change from
PersontoEntryin a number of different places.
- Eg: the class in question would have to change from
Understanding how MediCLI executes different types of commands
MediCLI currently supports four main types of functionality, namely: add, edit, query, and delete. Each of these functionalities are supported for both people (patient & doctor) and appointments through different command words.
However, different commands of the same functionality are analougous to each other to enhance readablity and expandability.
Furthermore, all of the commands extend the main Command class, thus the primary difference between each of them is within their execute methods. For their general implementation, please refer the “Logic component” section above.
This section will explore the implemention of the execute methods for each of the four functionalities.
Add Functionality
Note: Add patient and doctor has been grouped together as they are very similar in implementation.
This reduces repetition of information and increases clarity.
Adds a new Patient or Doctor entry by indicating their NRIC, Name, DoB, and Phone.
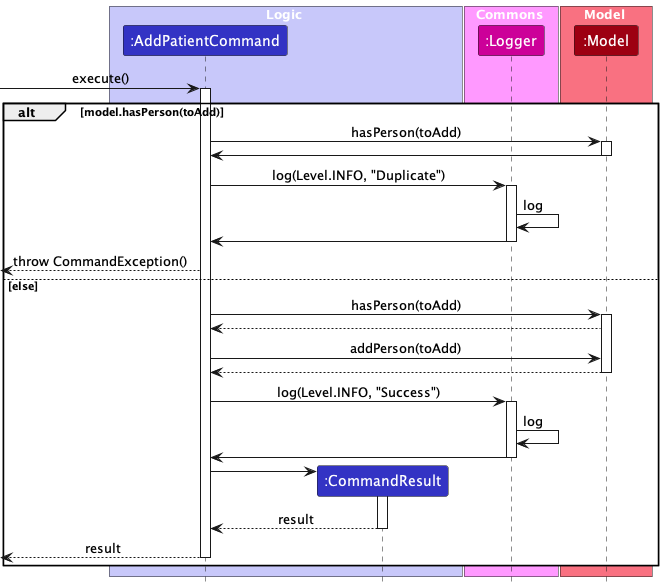
This command is implemented through the AddPatientCommand for patient and AddDoctorCommand for doctor class which both extend the Command class.
Add command execution sequence:
- Step 1. The
executemethod of theAddPatientCommandis called. - Step 2. The method calls the
hasPersonmethod ofModelto check if there are any duplicate patients.- If there is a duplicate person, the method throws
CommandExceptionand calls thelogmethod ofloggerto log the incident.
- If there is a duplicate person, the method throws
- Step 3. The
addPersonmethod ofModelis then called and the control is passed back to theexecutemethod. - Step 4. The
logmethod ofloggeris then called to log the successful command execution. - Step 5. A new
CommandResultobject with the success message is then created and returned byexecute.
This is the sequence of command execution for execute in AddPatientCommand, however AddDoctorCommand and AddAppointmentCommand follow similar design patterns within the execute command.
Edit Functionality
Edits a doctor or patient entry by indicating their Index.
This command is implemented through the EditCommand class which extends the Command class.
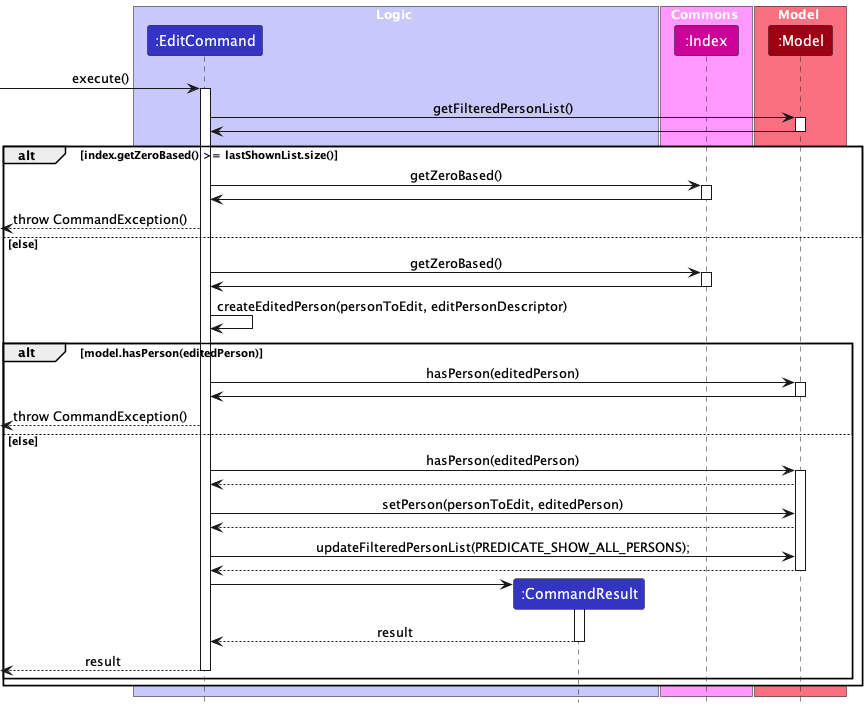
This is the sequence of command execution for execute in EditCommand, however EditAppointmentCommand follow a similar design pattern within the execute command.
- Step 1. The
executemethod of theEditCommandis called. - Step 2. The method calls the
getFilteredPersonListmethod ofModeland returns the list. - Step 3. The command checks whether the index of the command is valid by comparing the value returned by the
getZeroBasedmethod ofindexto the size of the list.- If the index is invalid, the command throws
CommandException.
- If the index is invalid, the command throws
- Step 4. The
createEditedPersonmethod is called and returns a new edited person. - Step 5. The method calls the
hasPersonmethod ofModelto check if there are any duplicate persons.- If there are duplicates, the command throws
CommandException.
- If there are duplicates, the command throws
- Step 6. The
setPersonmethod ofModelis called and control is then passed back to theexecutemethod. - Step 7. The
updateFilteredPersonListmethod ofModelis called to update the list. - Step 8. A new
CommandResultwith the success message is then created and returned byexecute.
The sequence diagram below demonstrates the command execution steps for execute method in EditCommand.
Querying Functionality
This section describes the general sequence for commands that query entities. MediCLI has 5 different commands that serve this function: find, patient, doctor, apptforpatient and apptfordoctor.
Although this section describes only the patient command, each of the other commands, while lined with different predicates and have different requirements for their parameters, possesses similar implementation. Hence, the flow of method calls between classes are generally similar, and all 5 commands that query entities are described here together in one section.
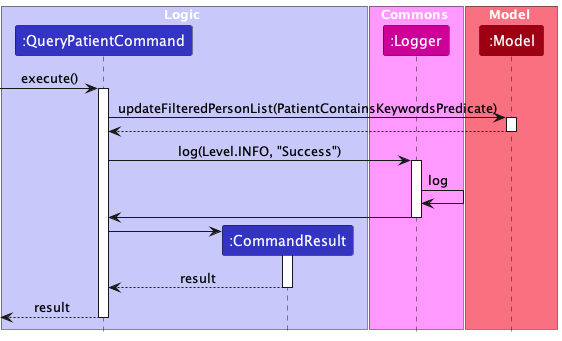
- Step 1. The
execute()method is called in an instance ofQueryPatientCommand. - Step 2. The instance of
QueryPatientCommandcalls theupdateFilteredPersonList()method with thePatientContainsKeywordsPredicatein an instance of theModelclass, which filters out entries and returns only patients that match the keywords entered. Note that the other commands listed here will have their respectivepredicaterequirements and implementations. - Step 3. Control is passed to an instance of the
Loggerclass, which calls the methodlog()to log a “Success” message. - Step 4. The instance of
QueryPatientCommandcalls the constructor method of theCommandResultclass, which returns the final result. - Step 5. Control is returned to the caller with the final result.
The sequence diagram below describes the interaction between the various components during the execute method of the patient command, which uses the QueryPatientCommand on the backend.
Why is this implemented this way?
- All query command closely resembles the structure of the
findcommand. Each of the commands here have either stricter (i.e have stricter parameter requirements e.gapptforpatientandapptfordoctor) or looser (i.e searching for more fields e.gpatientanddoctor) predicates, but all generally have the same flow of control between theCommand,LoggerandModelclasses. - Conceptually, each of the 5 commands listed here are searching for different entities, and are hence split into separate commands despite having very similar structures.
Alternative implementations considered
- The behaviour of
patientanddoctor,apptforpatientandapptfordoctorhave similar requirements in terms of parameters, with the main difference being eitherpatientordoctortyped classes. We might consider combining each pair into one command, and using flags to distinguish the desired class (e.g a -doctor or -patient flag to indicate we wish to search for onlydoctorandpatiententries respectively) so as to avoid the need to create additional commands. However, we felt that at the time of implementation, separating the commands would be a cleaner strategy, and combining methods might overcomplicate the implementation. - Even if we did proceed with combining, the combined command was to be overloaded with flags, we foresaw that the creation of distinct commands to fit the flags parsed were unavoidable. As such, it was prudent to start with the implementation of the distinct commands first, and leave the possibility of combining as a later increment.
Delete Functionality
Deletes a doctor or patient entry by indicating their Index.
This command is implemented through the DeleteCommand class which extends the Command class.
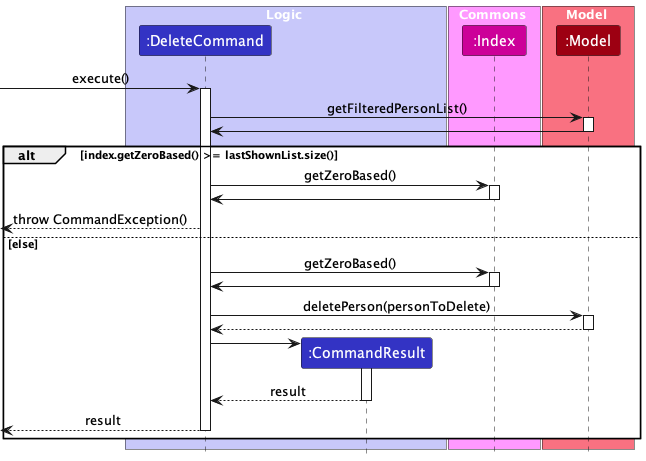
- Step 1. The
executemethod of theDeleteCommandis called. - Step 2. The
getFilteredPersonListmethod ofModelis called and finds its length. - Step 3. The
getZeroBasedmethod ofIndexis called to convert the provided index to its zero-based equivalent. - Step 4. The provided index is checked against the length of the current list of people.
- If the provided index is out of bounds, a
CommandExceptionis thrown.
- If the provided index is out of bounds, a
- Step 4. The
deletePersonmethod ofModelis called to remove the designated person from the list of people. - Step 5. An instance of
CommandResultis created with a success message for the execution ofDeleteCommand. - Step 6. The instance of
CommandResultis returned.
The sequence diagram below closely describes the interaction between the various components during the execute method of DeleteCommand.
Incorrect user input handling process
In this section, we will use the add commands for patients/doctors and appointments to demonstrate how MediCLI handles incorrect inputs from the user.
Incorrect input handling process for commands that involve operations on the Person class
The activity diagram below demonstrates this incorrect input handling process of a command that operates on the Person class.
Specifically, we look at the process of adding a Person to MediCLI i.e. addpatient or adddoctor commands, potential mistakes that the user might make, and how they are handled by MediCLI.
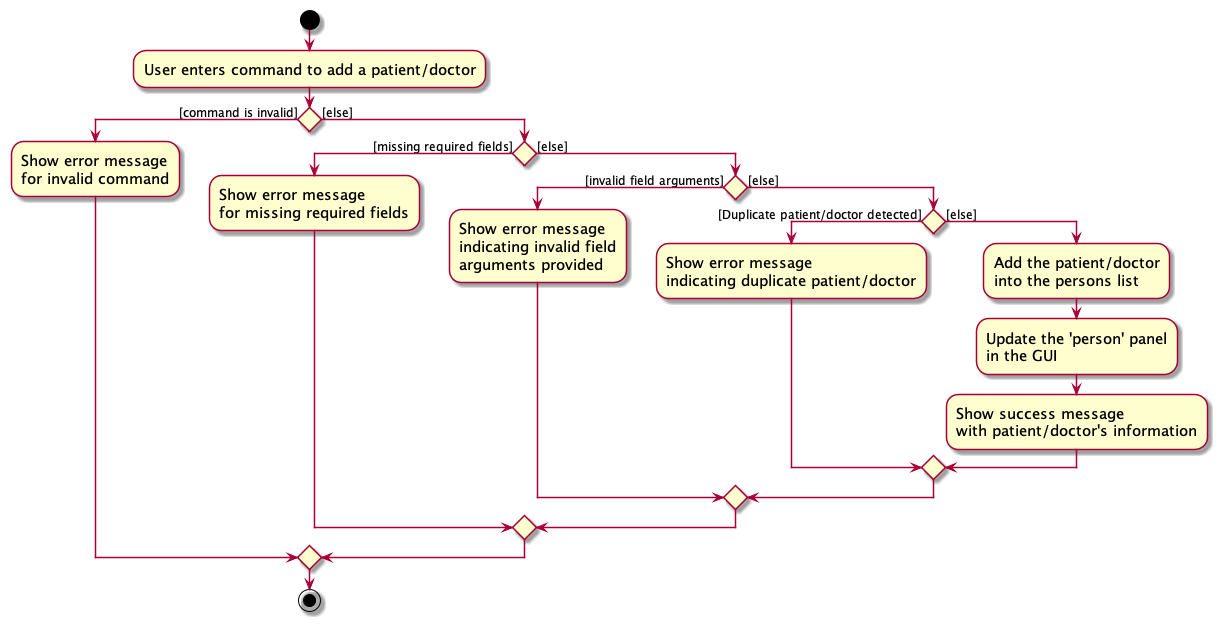
As visible, an incorrect input by the user can result in the following types of errors depending on the type of mistake:
- Command word is incorrect: informs the user that command word is unowkown.
- Missing required field arguments: informs the user of invalid command format.
- Invalid field arguments: highlights to the user that invalid field arguments were provided.
-
Patient/Doctorwith corresponding attributes already exists in the system: informs the user thatPatient/Doctoralready exists in the system.
Incorrect user input handling process for the Appointment class
The activity diagram below demonstrates this incorrect input handling process of a command that operates on the Appointment class.
Specifically, we look at the process of adding an Appointment to MediCLI i.e. addappt command, potential mistakes that the user might make, and how they are handled by MediCLI.
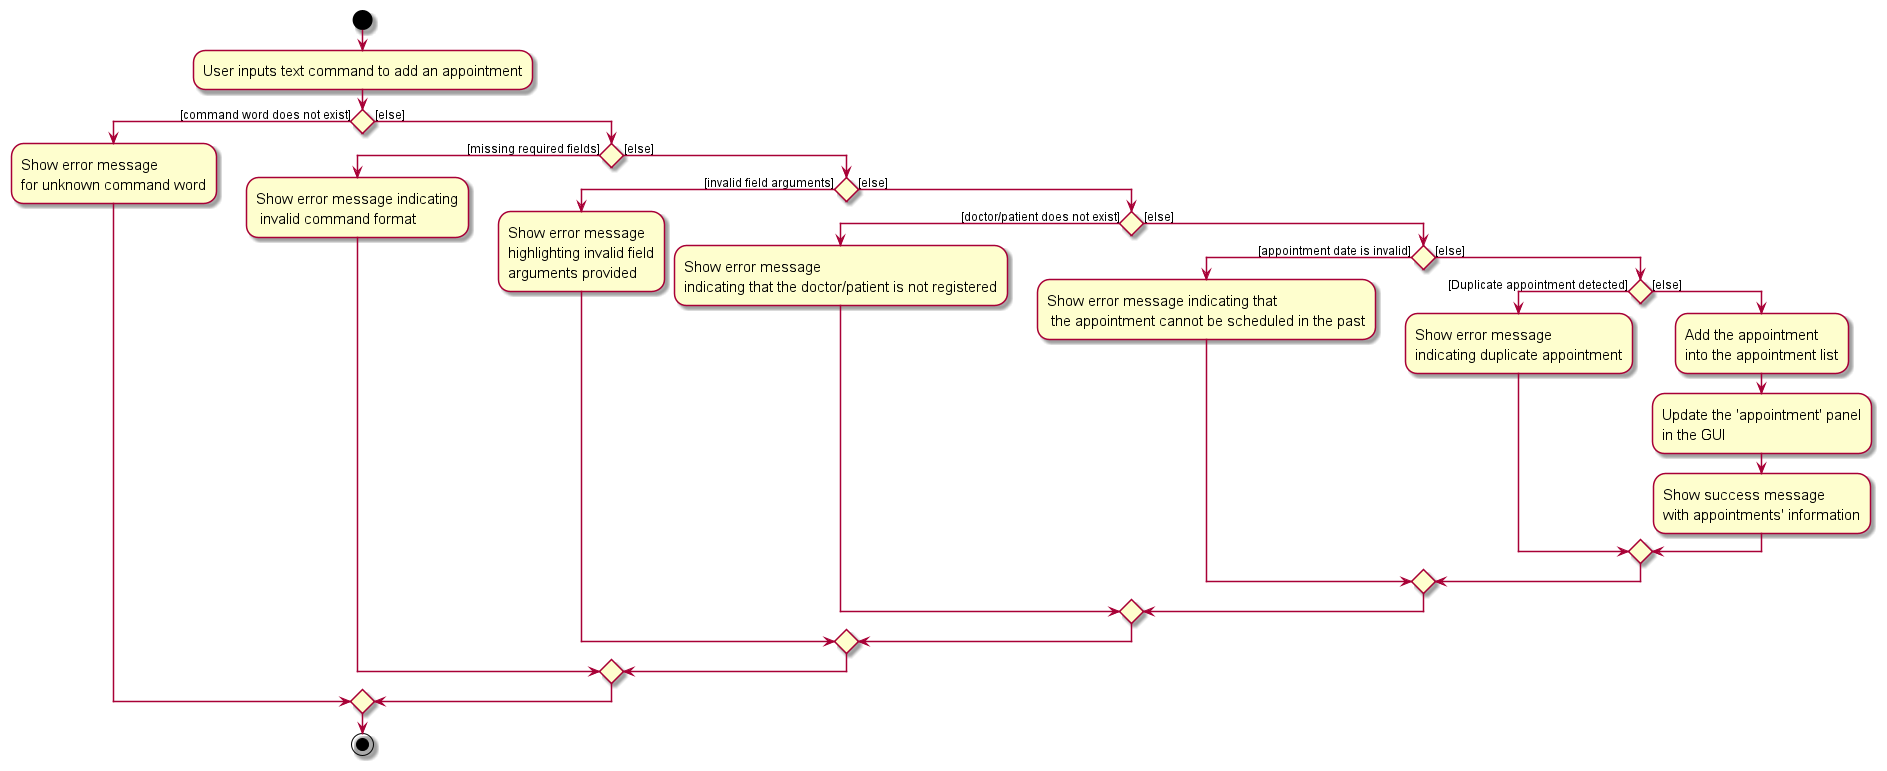
As visible, an incorrect input by the user can result in the following types of errors depending on the type of mistake:
- Command word is incorrect: informs the user that command word is unowkown
- Missing required field arguments: informs the user of invalid command format
- Invalid field arguments: highlights to the user that invalid field arguments were provided
-
Patient/Doctorinvolved in theAppointmentdoes not exist in MediCLI: informs the user thatPatient/Doctorinvolved are not registered -
Provided date & time of the
Appointmentis in the past: informs the user that appointments cannot be scheduled in the past. -
Appointmentwith corresponding attributes already exists in MediCLI: informs the user thatAppointmentalready exists
[Proposed] Undo/redo feature
Proposed Implementation
The proposed undo/redo mechanism is facilitated by VersionedMediCLI. It extends MediCLI with an undo/redo history, stored internally as an MediCLIStateList and currentStatePointer. Additionally, it implements the following operations:
-
VersionedMediCLI#commit()— Saves the current MediCLI state in its history. -
VersionedMediCLI#undo()— Restores the previous MediCLI state from its history. -
VersionedMediCLI#redo()— Restores a previously undone MediCLI state from its history.
These operations are exposed in the Model interface as Model#commitMediCLI(), Model#undoMediCLI() and Model#redoMediCLI() respectively.
Given below is an example usage scenario and how the undo/redo mechanism behaves at each step.
Step 1. The user launches the application for the first time. The VersionedMediCLI will be initialized with the initial MediCLI state, and the currentStatePointer pointing to that single MediCLI state.

Step 2. The user executes delete 5 command to delete the 5th person in the MediCLI. The delete command calls Model#commitMediCLI(), causing the modified state of the MediCLI after the delete 5 command executes to be saved in the MediCLIStateList, and the currentStatePointer is shifted to the newly inserted address book state.

Step 3. The user executes addpatient i/S1234567A n/John Doe d/2003-01-30 p/98765432 to add a new person. The add command also calls Model#commitMediCLI(), causing another modified MediCLI state to be saved into the MediCLIStateList.

Model#commitMediCLI(), so the MediCLI state will not be saved into the MediCLIStateList.
Step 4. The user now decides that adding the person was a mistake, and decides to undo that action by executing the undo command. The undo command will call Model#undoMediCLI(), which will shift the currentStatePointer once to the left, pointing it to the previous MediCLI state, and restores the MediCLI to that state.

currentStatePointer is at index 0, pointing to the initial MediCLI state, then there are no previous MediCLI states to restore. The undo command uses Model#canUndoMediCLI() to check if this is the case. If so, it will return an error to the user rather
than attempting to perform the undo.
The following sequence diagram shows how an undo operation goes through the Logic component:
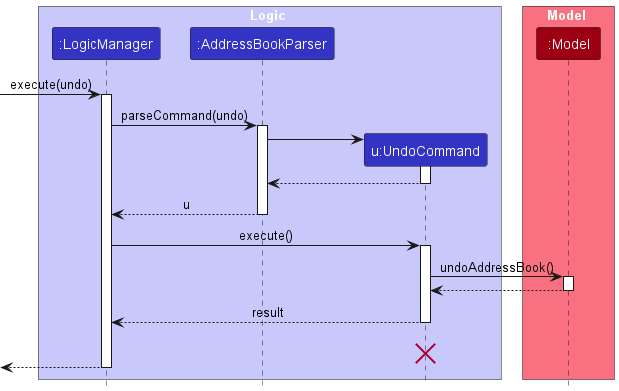
UndoCommand should end at the destroy marker (X) but due to a limitation of PlantUML, the lifeline reaches the end of diagram.
Similarly, how an undo operation goes through the Model component is shown below:
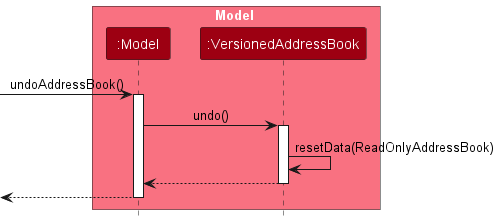
The redo command does the opposite — it calls Model#redoMediCLI(), which shifts the currentStatePointer once to the right, pointing to the previously undone state, and restores the MediCLI to that state.
currentStatePointer is at index MediCLIStateList.size() - 1, pointing to the latest MediCLI state, then there are no undone MediCLI states to restore. The redo command uses Model#canRedoMediCLI() to check if this is the case. If so, it will return an error to the user rather than attempting to perform the redo.
Step 5. The user then decides to execute the command list. Commands that do not modify the MediCLI, such as list, will usually not call Model#commitMediCLI(), Model#undoMediCLI() or Model#redoMediCLI(). Thus, the MediCLIStateList remains unchanged.

Step 6. The user executes clear, which calls Model#commitMediCLI(). Since the currentStatePointer is not pointing at the end of the MediCLIStateList, all MediCLI states after the currentStatePointer will be purged. Reason: It no longer makes sense to redo the addpatient i/S1234567A n/John Doe d/2003-01-30 p/98765432 command. This is the behavior that most modern desktop applications follow.

The following activity diagram summarizes what happens when a user executes a new command:

Design considerations:
Aspect: How undo & redo executes:
-
Alternative 1 (current choice): Saves the entire MediCLI.
-
Pros: Easy to implement.
-
Cons: May have performance issues in terms of memory usage.
-
-
Alternative 2: Individual command knows how to undo/redo by
itself.
-
Pros: Will use less memory (e.g. for
delete, just save the person being deleted). -
Cons: We must ensure that the implementation of each individual command are correct.
-
Documentation, logging, testing, configuration, dev-ops
Appendix: Requirements
Product scope
Target user profile:
- hospital clerks who deal with hospital related registration/administrative/management tasks
- has a need to manage a significant number of client details (patients/doctors/appointments)
- deals with many real time live updates, some being time-critical
- prefer desktop apps over other types
- can type fast and accurately
- prefers typing to mouse interactions
- is reasonably comfortable using CLI apps
Value proposition:
MediCLI is a hospital management system that offers clerks the ability to execute querying/updating/creating/deleting commands faster than a typical mouse/GUI driven hospital management system, significantly speeding up the data entry/update/retrieval process.
As clerks likely execute many such commands each day, this offers a significant amount of time savings when considered on the whole. While this would be beneficial in any situation, this is especially important in a hospital setting where the stakes are much higher, and staff are required to perform at a very high level of efficiency with limited room for error
User stories
Priorities: High (must have) - * * *, Medium (nice to have) - * *, Low (unlikely to have) - *
| Priority | As a … | I want to … | So that I can… |
|---|---|---|---|
* * * |
hospital clerk | add patients | handle incoming patients when handling emergency call-ins |
* * * |
hospital clerk | delete patients | remove old patients to prevent clogging of system |
* * * |
hospital clerk | add doctors | register new doctors as they get hired |
* * * |
hospital clerk | delete doctors | remove previous doctors that have left the hospital |
* * * |
hospital clerk | create appointments | arrange a meeting time between a doctor and a patient |
* * * |
hospital clerk | delete appointments | remove a meeting time if either party becomes unavailable |
* * * |
hospital clerk | query patient by name | retrieve their relevant information |
* * * |
hospital clerk | query doctor by name | retrieve their relevant information |
* * |
hospital clerk | query appointment by patient | look up what appointments a patient has to attend |
* * |
hospital clerk | query appointment by doctor | look up what appointments a doctor has to service |
* |
hospital clerk | query patient by other fields | retrieve patient information through other fields if they call-in |
* |
hospital clerk | find available timings to book appointment | schedule a time that suits both the patient and doctor |
Use cases
(For all use cases below, the System is the MediCLI and the Actor is the hospital clerk, unless specified otherwise)
(Note: For all use cases, if you enter the command format wrongly, MediCLI will show an error message and return to step 1.)
Use case: Add a patient
MSS
- Hospital clerk needs to add a patient
- Hospital clerk enters patient data
- MediCLI adds the patient into database
Use case ends.
Extensions
- 2a. The entered patient data is not in the correct format
-
2a1. MediCLI shows an error message.
Use case resumes at step 1.
-
- 2b. The entered patient is already in the database
-
2b1. MediCLI shows an error message.
Use case resumes at step 1.
-
Use case: Delete a patient
MSS
- Hospital clerk requests to list persons
- MediCLI shows a list of persons
- Hospital clerk requests to delete a specific patient in the list
- MediCLI deletes the patient
Use case ends.
Extensions
-
2a. The list is empty.
Use case resumes at step 1.
-
3a. The given patient index is invalid.
-
3a1. MediCLI shows an error message.
Use case resumes at step 1.
-
Use case: Create an appointment
MSS
- Hospital clerk needs to create appointment between doctor and patient
- Hospital clerk enters doctor and patient details
-
MediCLI creates the appointment
Use case ends.
Extensions
- 2a. The entered doctor or patient detail is invalid.
-
2a1. MediCLI will show an error message.
Use case resumes at step 1.
-
- 2b. The entered appointment date is invalid
-
2b1. MediCLI will show an error message.
Use case resumes at step 1.
-
Use case: Delete an appointment
MSS
- Hospital clerk needs to delete appointment between doctor and patient
- Hospital clerk enters appointment index
-
MediCLI deletes the appointment
Use case ends.
Extensions
- 2a. The entered appointment index is invalid.
-
2a1. MediCLI shows an error message.
Use case resumes at step 1.
-
Use case: Query patient by name
MSS
- Hospital clerk needs to search for patient
- Hospital clerk enters patient name
- MediCLI lists patients with supplied name
Use case ends.
Extensions
-
3a. The list is empty
Use case resumes at step 1.
Use case: Query appointments by patient
MSS
- Hospital clerk needs to search for appointment by patient
- Hospital clerk enters patient name
- MediCLI lists relevant appointments
Use case ends.
Extensions
-
3a. The list is empty
Use case resumes at step 1.
Use case: Query appointments by doctor
MSS
- Hospital clerk needs to search for appointment by doctor
- Hospital clerk enters doctor name
- MediCLI lists relevant appointments
Use case ends.
Extensions
-
3a. The list is empty
Use case resumes at step 1.
Non-Functional Requirements
- Should work on any mainstream OS as long as it has Java
11or above installed. - Should be able to hold up to 1000 medical staff without a noticeable sluggishness in performance for typical usage.
- A user with above average typing speed for regular English text (i.e. not code, not system admin commands) should be able to accomplish most of the tasks faster using commands than using the mouse.
- MediCLI should be easy to integrate with existing medical database systems so that staff can immediately switch to the new app.
- Comprehensive documentation should be provided, including user guides, command references, and troubleshooting resources.
- MediCLI should not need an internet connection to run.
- The GUI for MediCLI should be well organised, purpose oriented and easy to understand for users of any knowledge level.
- MediCLI should handle the majority of common user errors and give the users suggestions to mitigate these errors.
- MediCLI does not support concurrent usage between multiple users.
- MediCLI does not support languages other than English.
Glossary
- Private contact detail: A contact detail that is not meant to be shared with others.
- CLI: Command Line Interface, a way of interacting with a computer program where the user enters commands into a terminal or command prompt.
- GUI: Graphical User Interface, a way of interacting with a computer program using graphical elements such as windows, buttons, and menus.
- JSON: JSON: JavaScript Object Notation, a lightweight data interchange format used to store and exchange data.
- API: Application Programming Interface, a set of rules and protocols for building and interacting with software applications.
- UI: User Interface, the visual part of a computer program that allows users to interact with it.
- XML: Extensible Markup Language, a markup language that defines rules for encoding documents in a format that is both human-readable and machine-readable.
- MSS: Main Success Scenario, the primary flow of events in a use case that leads to the desired outcome.
Appendix: Instructions for Manual Testing
This section provides guidance for testers to navigate through the user-testable features of MediCLI. It includes important test inputs along with the expected test results that can be copied and pasted into the app for testing purposes.
Launch and shutdown
Initial launch
Steps:
- Download the jar file and copy into an empty folder.
- Double-click the jar file.
Expected Outcome:
- Shows the GUI with a set of sample contacts.
- The window size may not be optimum.
Saving window preferences
Steps:
- Resize the window to an optimum size.
- Move the window to a different location.
- Close the window.
- Re-launch the app by double-clicking the jar file.
Expected Outcome:
- The most recent window size and location is retained.
Closing MediCLI
Steps:
- Execute the
exitcommand, or simply close the window.
Expected Outcome:
- MediCLI closes without any errors.
Person Related Commands
Adding a Patient : addpatient
Steps:
- Execute the
addpatientcommand with valid NRIC, name, DOB, and phone number. - Verify that the patient is successfully added to the system.
- Try adding a patient with an existing NRIC and verify that the command fails.
- Attempt to add a patient with invalid or missing fields and confirm appropriate error handling.
Valid Inputs:
- Valid NRIC, name, DOB, and phone number.
- Example:
addpatient i/S1234567A n/David Li d/2000-01-01 p/98765432
Expected Outcome:
- Patient is successfully added to the system.
Invalid Inputs:
- Missing or invalid fields (e.g. invalid NRIC format, missing name).
- Example:
addpatient i/1234567A n/ d/2000-01-01 p/12345678
Expected Error:
- Command fails with the ‘Invalid command format’ error message indicating the required command format.
Adding a Doctor : adddoctor
Steps:
- Use the
adddoctorcommand with valid NRIC, name, DOB, and phone number. - Verify that the doctor is added to the system.
- Test adding a doctor with an existing NRIC and check if the command fails.
- Test adding a doctor with invalid or missing fields and observe error handling.
Valid Inputs:
- Valid NRIC, name, DOB, and phone number.
- Example:
adddoctor i/S1234567A n/Dr. Jane Smith d/1975-05-15 p/98765432
Expected Outcome:
- Doctor is successfully added to the system.
Invalid Inputs:
- Missing or invalid fields (e.g. invalid phone number).
- Example:
adddoctor i/S1234567A n/Dr. Jane Smith d/1975-05-15 p/1234567
Expected Error:
- Command fails with the ‘Invalid command format’ error message indicating the required command format.
Editing a Person : edit
Steps:
- Execute the
editcommand with the index of an existing person. - Update one or more fields (NRIC, name, DOB, or phone number) and confirm changes.
- Test editing without changing any values and ensure it’s handled correctly.
- Try editing with an invalid index and verify error handling.
Valid Inputs:
- Index of an existing person and valid fields to update.
- Example:
edit 1 n/John Smith
Expected Outcome:
- Person’s name has been successfully updated to John Smith.
Invalid Inputs:
- Invalid index or missing fields.
- Example:
edit 0 n/John Smith - Example:
edit 1
Expected Error:
- Command fails with the appropriate error message indicating the invalid index or missing fields.
Finding Persons by Name : find
Steps:
- Use the
findcommand with keywords to search for both patients and doctors. - Ensure the command returns expected results based on the provided keywords.
- Try different combinations of keywords and verify the search results.
Valid Inputs:
- Keywords matching existing persons’ names.
- Example:
find John
Expected Outcome:
- List of persons matching the keywords is displayed.
Invalid Inputs:
- No matching keywords or invalid syntax.
- Example:
find 123
Expected Error:
- Results display indicates ‘0 persons listed’, and the Persons panel is empty.
Finding Persons by all Fields : patient, doctor
Steps:
- Use the
patientcommand with keywords to search for patients only. - Ensure the command returns expected results based on the provided keywords.
- Similarly, use the
doctorcommand to search for doctors. - Try different combinations of keywords and verify the search results.
Valid Inputs:
- Keywords exactly matching or substring matching existing persons’ nric, name, date of birth, or phone number.
- Example:
patient S1234 - Example:
patient Doe - Example:
doctor 30 Jan - Example:
doctor 98765432
Expected Outcome:
- List of patients or doctors exactly matching or substring matching the keywords is displayed.
Invalid Inputs:
- No matching keywords or invalid syntax.
- Example:
patient - Example:
doctor @
Expected Error:
- Command fails with the appropriate error message indicating the required command format.
- Or the results display indicates ‘0 persons listed’, and the Persons panel is empty.
Deleting a Person (delete)
Steps:
- Use the
listcommand to display a list of persons. - Execute the
deletecommand with the index of a person to delete them. - Confirm that the person is removed from MediCLI.
- Verify that associated appointments are also deleted recursively.
- Test deleting a person with an invalid index and observe error handling.
Valid Inputs:
- Index of an existing person.
- Example:
delete 1
Expected Outcome:
- Person is successfully deleted from the system.
Invalid Inputs:
- Invalid index.
- Example:
delete 0
Expected Error:
- Command fails with appropriate error message indicating the required command format and parameter requirements.
Appointment Related Commands
Adding an Appointment : addappt
Steps:
- Execute the
addapptcommand with valid datetime, doctor’s NRIC, and patient’s NRIC. - Ensure the appointment is successfully added to the system.
- Test adding an appointment with invalid datetime or NRICs and verify error handling.
Valid Inputs:
- Valid datetime, doctor’s NRIC, and patient’s NRIC.
- Example:
addappt ad/2024-08-11 12:00 dn/S1234567A pn/S7654321B
Expected Outcome:
- Appointment is successfully added to the system.
Invalid Inputs:
- Missing or invalid datetime, doctor’s NRIC, or patient’s NRIC.
- Example:
addappt ad/2024-08-11 dn/S1234567A pn/S7654321B
Expected Error:
- Command fails with appropriate error message indicating the required command format.
Editing an Appointment : editappt
Steps:
- Use the editappt command with the index of an existing appointment.
- Update the datetime of the appointment and confirm changes.
- Test editing without changing any values and ensure it’s handled correctly.
- Try editing with an invalid index and verify error handling.
Valid Inputs:
- Index of an existing appointment and valid datetime to update.
- Example:
editappt 1 ad/2024-08-12 14:00
Expected Outcome:
- Appointment datetime is successfully updated.
Invalid Inputs:
- Invalid index or missing datetime.
- Example:
editappt 0 ad/2024-08-12 14:00
Expected Error:
- Command fails with appropriate error message indicating the required command format.
Querying Appointments by Patient’s NRIC : apptforpatient
Steps:
- Execute the
apptforpatientcommand with a patient’s exact NRIC. - Verify that all appointments involving the specified patient are listed.
- Test with different patient NRICs and confirm the results.
Valid Inputs:
- Patient’s NRIC.
- Example:
apptforpatient S7654321B
Expected Outcome:
- List of appointments involving the specified patient is displayed.
Invalid Inputs:
- No matching patient NRIC, missing NRIC or invalid NRIC.
- Example:
apptforpatient S1234567A - Example:
apptforpatient - Example:
apptforpatient S123456
Expected Error:
- Command fails with appropriate error message indicating the required command format.
- Or the results display indicates ‘0 appointments listed’, and the appointments panel is empty.
Querying Appointments by Doctor’s NRIC : apptfordoctor
Steps:
- Use the
apptfordoctorcommand with a doctor’s NRIC. - Ensure that all appointments involving the specified doctor are listed.
- Test with different doctor NRICs and verify the results.
Valid Inputs:
- Doctor’s NRIC.
- Example:
apptfordoctor S1234567A
Expected Outcome:
- List of appointments involving the specified doctor is displayed.
Invalid Inputs:
- No matching patient NRIC, missing NRIC or invalid NRIC.
- Example:
apptfordoctor S1234567A - Example:
apptfordoctor - Example:
apptfordoctor S123456
Expected Error:
- Command fails with appropriate error message indicating the required command format.
- Or the results display indicates ‘0 appointments listed’, and the appointments panel is empty.
Deleting an Appointment : deleteappt
Steps:
- Use the
listcommand to display a list of appointments. - Execute the
deleteapptcommand with the index of an appointment to delete it. - Confirm that the appointment is removed from the system.
- Test deleting an appointment with an invalid index and observe error handling.
Valid Inputs:
- Index of an existing appointment.
- Example:
deleteappt 1
Expected Outcome:
- Appointment is successfully deleted from the system.
Invalid Inputs:
- Invalid index.
- Example:
deleteappt 0
Expected Error:
- Command fails with appropriate error message indicating the required command format.
Miscellaneous Commands
Viewing Help : help
Steps:
- Execute the
helpcommand and ensure the help message is displayed. - Verify that the ‘Help’ pop up is displayed, and click the ‘Copy URL’ button.
- Verify that pasting the URL in your browser leads you to MediCLI’s updated User-Guide page.
Valid Inputs:
- None
Expected Outcome:
- ‘Help’ pop up is displayed successfully.
Invalid Inputs:
- None
Expected Error:
- None
Listing All Persons and Appointments : list
Steps:
- Use the
listcommand to display all persons and appointments. - Confirm that the Persons Panel and the Appointments Panel includes all existing patients, doctors, and appointments existing in MediCLI.
Valid Inputs:
- None
Expected Outcome:
- All persons and appointments are displayed.
Invalid Inputs:
- None
Expected Error:
- None
Clearing All Entries : clear
Steps:
- Execute the
clearcommand and confirm if all data is wiped from MediCLI. - Ensure there is no remaining data after executing this command.
- Verify that there is no confirmation prompt and data deletion is immediate.
Valid Inputs:
- None
Expected Outcome:
- All data is wiped from MediCLI.
- Results display indicates that ‘MediCLI’s storage has been cleared!’
Invalid Inputs:
- None
Expected Error:
- None
Exiting the Program : exit
Steps:
- Execute the
exitcommand and ensure the program exits gracefully.
Valid Inputs:
- None
Expected Outcome:
- Program exits without errors.
Invalid Inputs:
- None
Expected Error:
- None
Appendix: Effort
Difficulty level:
If AB3 was at a difficulty level of 5/10, MediCLI reached was at a level of 8/10. This is most significantly because of the following reasons:
- Expansion of
Personentity type to includePatientandDoctorentities. - Inclusion of a completely new
Appointmententity type.
The expansion into Patient and Doctor required us to expand the suite of commands to account for them, as well as modify the backend methods to account for the changes.
However, the Appointment class required us to build a completely new parallel infrastructure from UI to the commands to the storage and significantly increased the challenge and difficulty of the project.
Challenges faced:
We faced multiple challenges in the project, most significant of which are highlighted below:
- Developing the
Appointmentsfeature: As a completely new entity type, we had to build this from the ground up while also integrating it the best way we could with the existing AB3 codebase, which was a big challenge. Even simple things like theaddAppointmentcommand required a large amount of implementation effort. Beyond just the functional code, writing tests for this and making sure that a sufficient portion was tested using automated tests was quite difficult as we had no existing code that we could build off-of, or modify. - Achieving sufficient test coverage - as we have a fairly large amount of functional LOC written, a natural consequence is that we had to write a lot of test code to ensure that they were sufficiently tested. This was a challenge, especially in the beginning when we were just familiarising ourselves with automated tests.
- UI enhancements: As
javafxwas a completely new framework for everyone in our team, we found it rather difficult to actually make the UI enhancements that we wanted. Particularly we had to make a completely newcardfor appointments and we made changes to the general look and feel to make it more suitable for a hospital, which was a significant step away from the AB3 UI, hence the difficulty. - Finally, another difficulty we faced was actually considering the edge-cases and various scenarios that may arise from interactions between the different entities we were managing:
- Let’s say you have a
Doctorwith multipleAppointments, what do you do if the user deletes theDoctorfrom MediCLI? We decided that the most appropriate approach would be to recursively delete allAppointmentsassociated with the doctor. - Similarly, what if you want to add an
Appointmentbut thePatientinvolved doesn’t exist in the records? We had to implement checks to prevent this. - Many other similar issues resulting from the interactions of different entities were noted and we found it quite challenging to actually identify and resolve all of them so they didn’t become a bug or feature flaw down the line.
- Let’s say you have a
Effort required:
In the previous sections we have already elaborated a little on the challenges and difficulties and talked about the efforts we put into addressing them. As such, for this section we have focused on quantifying the overall project effort.
On the whole, the project took us the entire duration that was offered, with most of us writing upwards of 1000 lines of functional code. The Appointments feature was naturally the biggest cause of this and it led to a number of issues that were quite effort-intensive to resolve.
On a weekly basis, each of us invested about 8 hours on average in writing code, writing automated tests, documenting and manually testing the feature.
For team meetings, we would meet up twice a week, one time at the start to distribute work for the week and discuss deliverables, and one time in the end to wrap up the milestone/work for the week and submit the deliverables. Altogether we spent about 3 hours in meetings per week.
Achievements:
Some achievements we are particulary proud of are:
- Robustness of
Appointmentsfeature: We tried to consider all the edge cases and problematic aspects of this and preemptively prevent them to make sure the user has a seamless experience. - UI improvements: We are quite happy with the way
AppointmentsandPatients/Doctorsare integrated into the same window to allow for easy visualisation with minimal use of the mouse. We are also quite proud of the new clean and minimalist interface which we think reflects a hospital setting quite well. - Variety of commands: We also are happy with the suite of commands that we offer to users. We focused on the most high-impact commands and ensured that our product offers all CRUD capabilities such that it may actually be used in a functional setting for a small clinic/hospital.
- Comprehensive testing: While we do not claim to be bug-free, we did a comprehensive amount of testing including testing our product ourselves manually, through automated tests, and even asking other teams to perform their own UAT on our product to identify pain-points/bugs/feature flaws (that we went on to address).
Appendix: Planned Enhancements
The MediCLI development team (consisting of 5 members) acknowledges the presense of known feature flaws in our system. Thus, we have planned the following 10 enhancements to be added in the near future. Please find them organised into their respective categories.
Appointment Functionality Enhancements
1. Adding an end time to appointments
Currently, the MediCLI system only stores the date and start time of an appointment. However, we recognise that in a fast-paced environment like a hospital, it’d be beneficial to also be able to indicate an end time for appointments. This is so that the doctor can be safely booked by another patient without worrying about potential clashes in appointment timings.
-
Updated Command Format -
addappt sdt/STARTDATETIME [edt/ENDDATETIME] dn/DOCTORNRIC pn/PATIENTNRIC -
Example Input -
addappt sdt/2024-05-20 10:00 edt/2024-05-20 11:00 dn/S1234567A pn/S1234567B
2. More robust appointment timing validation.
Currently, the MediCLI system allows two appointments with the same doctor/patient and date-time to be simultaneously stored in the system. However, it is clearly impossible for a patient or doctor to attend two different appointments at the same time. Thus, we plan to implement a more robust appointment validation system to ensure that appointments with clashing or unrealistic timings can not be entered.
3. Marking old appointments as completed.
Even though the MediCLI system does not allow appointments to be made in the future, it nonetheless retains entry of completed appointments. However, there is currently no visual distinction between future, completed, and missed appointments. This can be rather confusing for the hospital clerks. Thus, we plan to add a label (just like the patient/doctor labels) in the top right corner of each appointment card to help better distinguish them.
-
New Command Format -
markappt index s/STATUS(STATUScan be any one of {completed,missed}) -
Example Input -
markappt 1 s/completed -
Example Input -
markappt 2 s/missed
Parameter Checking Enhancements
4. Accommodate names with symbols and/or special characters.
The name parameter is currently restricted to just alphabetical characters and white-space. However, we recognise the existence of names that contain symbols and other special characters. In the future, we plan to implement a more accommodating constraint that allows UTF-8 characters instead. This means that names of other languages will be accepted as well.
5. Allow foreign patients/doctors to be added to the system.
The current constraints for the NRIC and phone number parameters reflect the Singaporean format. However, we recognise that for foreign users, this can be rather limiting. Thus, in the future, we plan on introducing more refined parameter checking that allows international NRIC and phone number formats.
6. Ensure each person being added to the system is unique.
While the current MediCLI system already checks to ensure every person added is unique, it is only done by comparing the NRIC of the person. However, this should not be the only checking condition. Two entries with the same name, date of birth, and/or phone number should also be flagged as non-unique. Thus, we will devise a more holistic assessment criterion to ensure no duplicates are allowed.
User Interface Enhancements
7. Refine the user interface when the window size is minimised.
The current MediCLI system is not particularly flexible when it comes to window sizing. Users on smaller screens may encounter the issue of scrolling being disabled or labels being truncated if a long name is entered. In the future, we plan to make the UI more adaptive and friendly to smaller screens.
8Standardise displayed information.
For certain fields, the MediCLI system simply displays the text exactly as entered by the user. However, this can introduce inconsistencies in capitalisation (especially with the NRIC field) when displayed in the user interface. We plan on standardising these fields by automatically capitalising the users’ input.
Feature Enhancements
9. More advanced search options
Currently, the find, patient, and doctor commands return all entries whose details contain any of the given keywords.
However, this implementation is not particularly effective if the user would like to search for a person that matches all the provided keywords exactly
(e.g. when searching for a person by full name). In the future, we plan to add more advanced search options to allow for easy querying of information.
-
Updated Command Format -
find t/TYPE KEYWORD,patient t/TYPE KEYWORD,doctor t/TYPE KEYWORD(TYPEcan be any one of {full,partial}). -
Example Input -
find t/full John Doe -
Example Input -
doctor t/partial Smith Li
10. More detailed error messages.
Some of the current error messages are not the most informative
(e.g. If two patient NRICs are provided when creating an appointment, the system only prompts This appointment is invalid due to invalid inputs.).
To decrease the learning curve for our system, we plan to replace all ambiguous error messages with more informative versions, e.g. Please make sure the NRIC provided belongs to a person of the correct type as indicated by the prefix..